This lovely folded star is also known as "German Christmas Star", "Eight Point Star", "Ribbon Star" and likely several other names. It was originally made in Germany with paper strips, but can be made with any creasable ribbon such as wire ribbon or "gift wrap" ribbon. The star requires only three types of folds, two of which get repeated eight times. A beginner can make this beautiful project in 20 minutes or so. Are you ready?
Part 1: Making the base
1,Cut four lengths of ribbon approximately 20 inches (50 cm) long.
2,Fold the ribbons in half and crease them at the halfway point.
3,Interweave the ribbon loops so that the loose ends of each ribbon pass through the loop of the next ribbon to its left.
4,Pull the loops snugly together.
5,Fold the top layer(s) of ribbon over each other successively so that they overlap.
6,Tuck the final ribbon under the loop formed by the first ribbon.
7,Snug it down.
Part 2: Folding the outer points
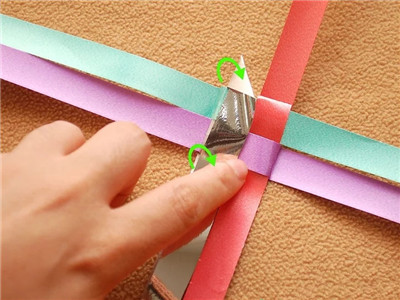
1,Look closely at the base. There should now be two ribbons coming out of each side. One ribbon (let's call it "A") on each side will come out under a fold of ribbon. The other ribbon (let's call it "B") will emerge out from under the side edge of a ribbon.
2,Lift ribbon "B" and fold it at a 45 degree angle under itself and out to the left.
3,Fold the "B" ribbon back down parallel to itself, creating yet another 45 degree angle.
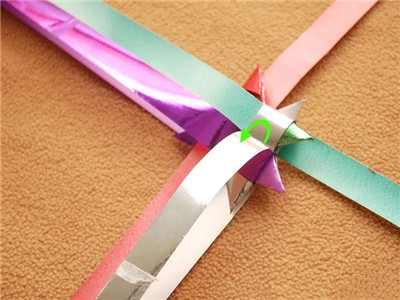
4,Fold the two angled pieces of ribbon together, making the ribbon lay over itself on the base.
5,Bend the newly formed point away from you and hold it there temporarily.
6,Slide the end of "B" under the edge of the ribbon "loop" on the base and snug it down gently.
7,Repeat the above steps for all four sides of the base.
8,Turn the base over and repeat, folding the outer points as instructed in this section.
Part 3: Making the 3-D points
1,Lay the base flat and lift one ribbon in the base, creasing it back on itself. Let's call this first ribbon "A".
2,Lift the next ribbon counter-clockwise from the ribbon above (let's call it "B") and crease it back on itself as well. The end of this ribbon (B) will get tucked under the first (A) in a few steps.
3,Fold the "B" ribbon out at a 45 degree angle, away from the center of the base. (Keep the original "back on itself" crease, then add the 45 degree angle to the outside.)
4,Allow the ribbon (B) to lift up off the base.
5,Curl the end of "B" around and tuck it under the "A", sliding the point through the base and out through the center of one of the flat points. Snug gently.
6,Repeat for all four ribbons on this side.
7,Stop at this point for a gift bow. Continue for an ornament.
Part 4:Ornament Star
1,Turn the base over.
2,Make the 3-D points, as outlined in the previous section, for all four ribbons on the second side.
3,Trim the ends of each ribbon close to the flat points.
4,Slide florist wire through one of the flat points OR punch a small hole to allow hanging.
5,Display proudly.
6,Finished.


.jpg)
.jpg)
.jpg)
.jpg)